
Healthy Alternatives for Your Fave Halloween Treats
Spooky season is upon us and that means it’s time to break out the sweaters, the scary movies, and the sugar.
We are huge fans of all of the above, but know we shouldn’t put the emphasis on sugar that we do. According to a study done by the U.S. Department of Agriculture in 2016, the average American eats 94 grams of sugar a day. And, as stated by the World Health Organization, we should be consuming no more than 25 grams of sugar a day.
This means we are way over our limit of sugar, and with Halloween right around the corner, we need to get creative of how to fulfill our sweet tooth without majorly upping our sugar intake.
Thus: our guide to healthy alternatives for your favorite Halloween treats. We are huge believers in enjoying some treats, but know that you can do it without the guilt.
Check out these recipes for your guilt-free Halloween treats.
Chocolate-Dipped Pumpkin Seed Brittle with Sea Salt
From justataste.com

The combo of sweet and salty in this will make all your tastebuds happy, and won’t leave you waiting for your sugar crash to hit. In fact, this treat is a great source of both protein and healthy fats, so enjoy!
What you need:
- 1 cup sugar
- ½ cup water
- ⅛ teaspoon fine sea salt
- 1 cup raw green pumpkin seeds (NOT toasted)
- ¾ cup bittersweet chocolate chips
- 1 Tablespoon large-flake sea salt
What to do:
- Tape a 24×12-inch sheet of parchment paper on your work surface.
- In medium saucepan, bring the sugar, water, and sea salt to a boil, stirring until the sugar is dissolved.
- Cook the mixture, without stirring, washing down any sugar crystals from the side of the pan with a pastry brush dipped in cold water, until the syrup registers 238F (with a candy thermometer), about 10-12 minutes.
- Remove mixture from the heat and stir in ¾ cup of the seeds with a wooden spoon, then continue stirring until syrup crystallizes, 3-4 minutes. The mixture will be dry and crumbly.
- Return the pan to medium heat and cook, stirring constantly, until the sugar melts completely and turns a deep caramel color, 4-5 minutes
- Pour hot mixture onto parchment and cover with a second sheet of parchment paper.
- Immediately roll out the mixture between the two sheets as thin as possible with a rolling pin (pressing firmly)
- Peel back the top layer of parchment and immediately cut the brittle into pieces with a sharp knife (or allow it to cool until firm and then break it into pieces). Cool brittle completely
- Melt the chocolate in a double-boiler or the microwave.
- Chop the remaining 1/4 cup pumpkin seeds.
- Dip the cooled brittle in the chocolate then immediately sprinkle the chocolate-covered area with the chopped pumpkin seeds and large-flake sea salt.
- Let cool until chocolate is firm then serve.
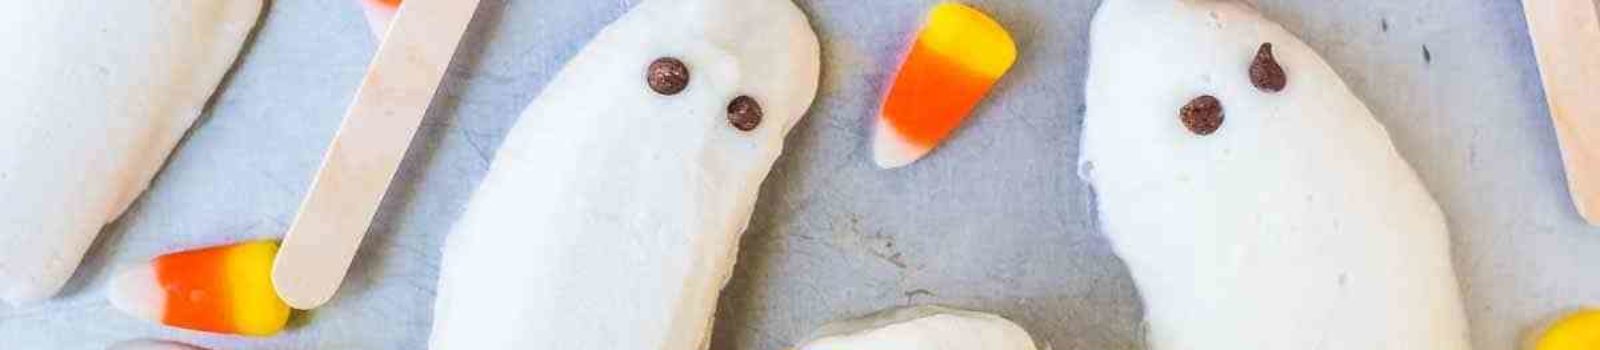
Halloween Banana Popsicles
From wellplated.com

It’s never too late in the season for popsicles (especially here in L.A.), and when they’re healthy popsicles with just a tid bit of guilty pleasure, then you’re really in for a treat.
What you need:
- 4 large fresh bananas
- 1 cup nonfat Greek vanilla yogurt
- 2 Tablespoons powdered sugar
- Mini semi-sweet chocolate chips
- 16 popsicle sticks
- ⅓ cup natural peanut butter
What to do:
- For the Banana Popsicle Ghosts: Line a large baking sheet with parchment paper.
- Peel 2 bananas and slice each in half, cross-wise. Slice each half in half again the “long” way, so that you have 4 long, narrow pieces total.
- Carefully insert a popsicle stick into the bottom of each, then place on the baking sheet.
- For the Banana Popsicle Mummies: Cut the pointy tips off of the 2 remaining bananas, then slice the bananas crosswise into 3 equal round “logs.”
- Insert a popsicle stick into one end of each, then place on the baking sheet.
- Freeze all banana pops for at least 30 minutes or overnight.
- In a small bowl, mix together the frozen yogurt and powdered sugar.
- Once the bananas are frozen, dip them into the yogurt mixture, then return them to the lined baking sheet.
- Place 2 mini chocolate chips on each of the ghosts for eyes. Do not place the eyes on the mummies yet.
- Return to the freezer for at least 1 hour to allow the yogurt to set.
- For the mummies, place the peanut butter in a small, microwave-safe bowl, then heat until smooth and creamy, about 30-45 seconds, stirring as needed.
- With a small spoon, drizzle on top of the banana mummies to make “bandages.”
- Place mini chocolate chips for eyes.
- Return to the freezer until the peanut butter is firm, about 30 additional minutes.
- When ready to serve, let the banana popsicles soften at room temperature for a few minutes.
- Enjoy immediately, or place in a ziptop bag and freeze for up to 2 months.
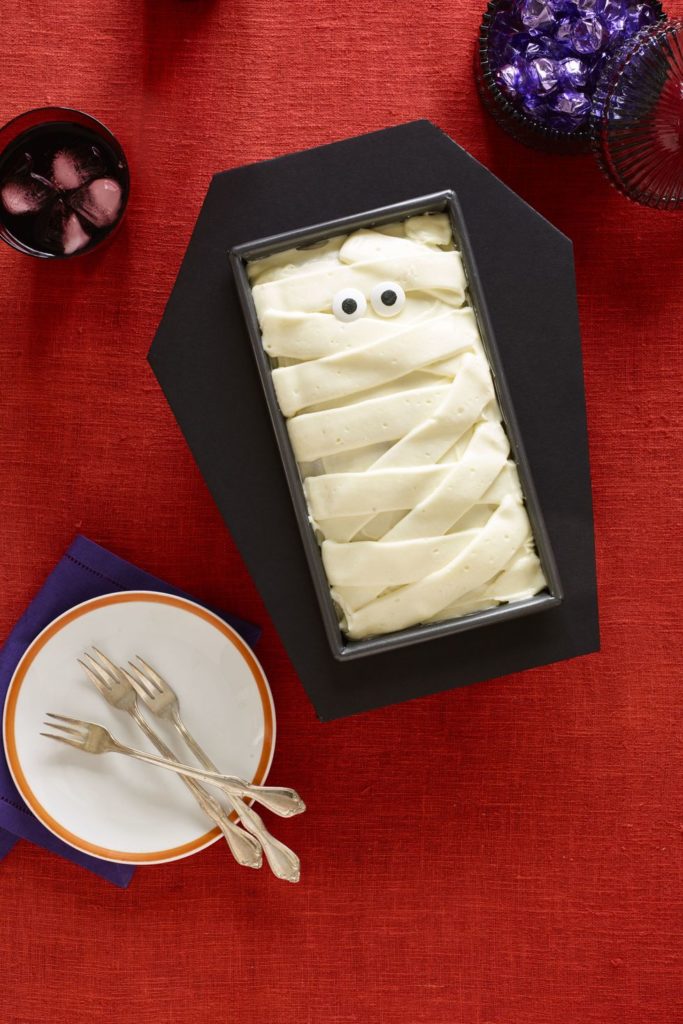
Coffin Cake
From womansday.com
What you need:
- Oil, for the pans
- 3 c. all-purpose flour
- 2 tsp. baking powder
- 1 tsp. baking soda
- 1/2 tsp. freshly ground nutmeg
- 1/2 tsp. kosher salt
- 2 c. sugar
- 1 c. (2 sticks) unsalted butter, melted
- 3 large eggs
- 1 15-oz. can pumpkin
- 1 tsp. pure vanilla extract
- 1/2 c. buttermilk
- FOR THE FROSTING
- 1 8-oz. package cream cheese, at room temperature
- 4 tbsp. unsalted butter, at room temperature
- 2 c. confectioners’ sugar
- 1/4 c. heavy cream
- 1/2 tsp. pure vanilla extract
- 4 candy eyeballs for serving
What to do:
- Heat oven to 350°F. Lightly oil two 8½ x 4½-in. loaf pans and line the bottoms with parchment paper, leaving at least 1 in. of overhang on the two long sides.
- In a large bowl, whisk together flour, baking powder, baking soda, nutmeg, and salt.
- In a second large bowl, beat together sugar, butter, eggs, pumpkin, and vanilla.
- Add flour mixture in 3 additions, alternating with buttermilk and mixing in between addition to combine.
- Divide mixture between the prepared loaf pans and bake, rotating the pans halfway through, until a wooden pick inserted into the center comes out clean, 65 to 70 minutes.
- Transfer the pans to a wire rack to cool for 10 minutes before using the parchment overhangs to remove cakes to a rack to cool completely.
- Using an electric mixer, beat cream cheese and butter in a large bowl on low speed until smooth.
- Add sugar, beating until just combined.
- Add heavy cream and vanilla and beat until soft peaks form, about 2 minutes.
- Spread a thin layer of frosting (about ¼ cup) over the top of each cake.
- Transfer remaining frosting to a large piping bag fitted with a large flat tip, then pipe lines back and forth on a diagonal to create mummy bandages. Place two candy eyeballs at one end of each cake.
Paleo Witch Finger Cookies
By foodfaithfitness.com
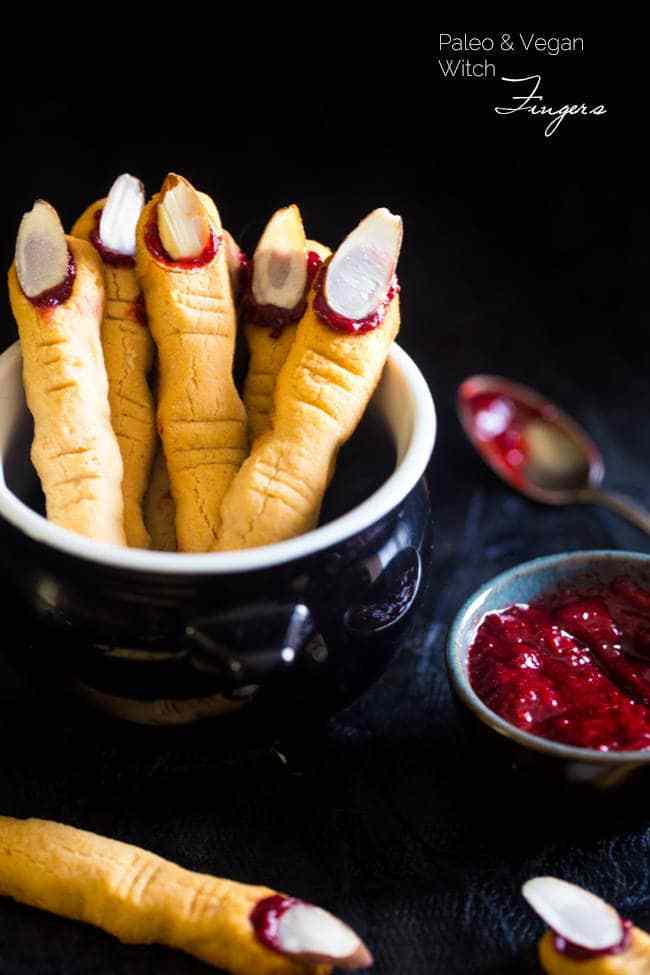
Witch finger cookies are a Halloween classic that you do not have to say “bye” to this year. Make them healthy and you can eat fingers all night!
What you need:
- For the cookies:
- 1/4 Cup + 3 Tbsp Honey *
- 1/2 Cup Coconut oil at room temperature (should be the consistency of softened butter)
- 1/2 tsp Vanilla extract
- 1/2 tsp Almond extract
- 1 Cup Coconut flour sifted (88g)
- 1/4 tsp salt
- 16 sliced almonds
- For the strawberry jelly: **
- 3/4 Cup frozen strawberries thawed and roughly chopped (170g – measured when fully thawed and soft)
- 2 Tbsp Honey
What to do:
- In a large bowl, using an electric hand mixer, beat together the honey and coconut oil until smooth and creamy.
- Add in the vanilla and almonds extracts and beat once more.
- Add the coconut flour and salt into the bowl and stir until well combined, and a wet dough forms.
- Scrape the dough onto a large piece of saran wrap and wrap into a flat, thin disc.
- Place into the refrigerator until firm and rollable, about 25-30 minutes.
- While the dough chills, preheat your oven to 325 degrees and line a baking sheet with parchment paper. Set aside.
- In a small sauce pan, combine the chopped berries and honey and bring to a boil over medium heat.
- Cook the berries, stirring frequently, until they become very thick and smooth, about 13-14 minutes. Make sure to really keep an eye at them near the end of cooking time, so they don’t burn.
- Transfer the berry mixture to a bowl and mash with a fork. Place into the refrigerator to set up.
- Remove the dough from the refrigerator and roll 1 Tbsp sized balls into 4 inch long finger-shapes, that are about 1/2 an inch thick.
- Place onto the prepared baking sheet and firmly press an sliced almond into the tip of the finger, to create fingernails.
- Remove the almond before baking.
- Then, using a small, sharp knife, make several horizontal, shallow cuts just under the finger nail, and then in the center of each finger, to represent knuckles.
- Lightly press in the dough on either sides of the knuckles to shape them.
- Place the whole pan into the freezer for 10 minutes.
- Once frozen, bake the cookies until golden brown, and lightly crackly (the cracks are normal, don’t worry!) about 12-13 *** minutes. Let cool on the pan COMPLETELY.
- Once cooled, dip the bottom of the finger into the strawberry jam, so it looks like it’s been cut off. Then, fill the finger nail space with a dollop of the jam, and press in a sliced almond.